The Paper in the Printer Almost Comes Out Than Goes in Again
Z7_3054ICK0KGTE30AQO5O3KA30N0
hp-concentra-wrapper-portlet
![]() Deportment
Deportment
'Out of Paper' Error Message and the Printer Does Not Choice up or Feed Paper for HP Deskjet 1050, 1050A, 2050, and 2050A All-in-Ane Printer Series
This document is for HP Deskjet 1050, 1050A, 2050, and 2050A All-in-One Printers.
Effect
The printer does not pick up or feed the paper from the tray. The printer might make noises as though it is press, but paper does not motility through.
How to use the solutions in this document
A paper feed issue tin can occur for several reasons, such every bit dusty or contaminated newspaper rollers, the condition of the paper in the tray, or even issues with the software.
To resolve the issue, try each solution in this document, and then utilize the steps in this section to impress a self-exam report. This step determines if the product hardware functions correctly. When you have resolved the consequence, and the production successfully prints a self-test report, in that location is no need to continue troubleshooting.
The following video demonstrates how to impress a cocky-test study.
note:This video shows the HP Deskjet 2050. The outside of the product might not await the aforementioned as your product, but the steps are the aforementioned.

.
| How to print a cocky-test report |
|
 ) and the Commencement Re-create Color button (
 ) until the product makes some noise.
Important: Attempt to print a self-test study after every solution even if the solution resolves the issue.
The following video demonstrates how to resolve an Out of Paper error message, when you practise have paper loaded.
note:This video shows the HP Deskjet 2050. The exterior of the product might not wait the same every bit your product, but the steps are the same.
.
Solution one: Perform a reset
Sometimes, restarting the production tin clear a newspaper feed result. Follow these steps to perform a reset.
Step 1: Reset the printer
-
With the printer turned on, disconnect the ability cord from the rear of the printer.
-
Unplug the power cord from the wall outlet.
-
Wait at least 15 seconds.
-
Plug the power cord dorsum into the wall outlet.
-
Reconnect the power cord to the printer.
-
Plough the printer on.
Stride two: Print a self-test report
Print a cocky-examination study. Run across the department on how to use these solutions at the kickoff of this document.
-
If the self-test report prints, try printing the original document again. If the issue is resolved, in that location is no need to go along troubleshooting.
-
If the issue persists, go on with the next solution.
-
If the self-exam report does non print, keep with the adjacent solution.
Solution ii: Check the condition of the paper, so reload it
Newspaper feed bug might result from dusty, torn, wrinkled, wet, or folded paper in the tray. The quality of the paper can besides make a difference. Use only practiced quality paper that meets product specifications. Follow these steps to check the status of the paper.
note:For the purposes of these troubleshooting steps, use only 10 to 25 sheets of manifestly white, unused paper.
Step 1: Check the condition of the paper
-
Remove the stack of paper from the tray.
-
Check for obstructions within the tray. Use a flashlight to view the mechanism inside the tray to make sure that zippo blocks the paper from engaging with the rollers. Even small pieces of paper tin can crusade paper feed issues.
note:
If you find obstructions in the newspaper path, skip to the department on cleaning the rollers.
-
Examine the status of the paper, and and then supplant any ripped, dusty, curled, wrinkled, or bent newspaper.
-
Brand sure that all the newspaper in the stack is the same size and type. Never load mixed types of newspaper in the tray. The product tin can only process 1 blazon of paper at a time.
-
Tap the stack of paper on a apartment surface to align the edges.
-
Make sure that the stack of paper contains no fewer than 10 sheets and no more than than 25 sheets of newspaper.
note:
You demand to use ten to 25 sheets of paper only for purposes of these troubleshooting steps. When the issue is resolved, you tin can resume loading paper co-ordinate to the paper tray capacity specifications for your product.
Step 2: Reload the paper
-
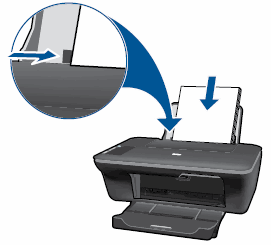
Slide the paper width guide to its outermost position.
-
Load a stack of 216 x 279 mm (8.five x 11 in) manifestly paper into the paper tray, print-side down. Slide the stack of paper in until it stops.
-
Slide the newspaper width guide snugly against the paper.
Figure : Load newspaper, and so conform the paper width guide
Pace 3: Print a self-test report
Print a cocky-test written report. See the department on how to utilise these solutions at the first of this document.
-
If the cocky-exam study prints, effort printing the original document again. If the event is resolved, there is no need to continue troubleshooting.
-
If the event persists, continue with the next solution.
-
If the self-exam written report does not impress, proceed with the next solution.
Solution three: Clean the paper choice rollers
Dust or newspaper residue on the rollers inside the product tin cause paper feed issues. Follow these steps to make clean the rollers.
Footstep 1: Clean the paper pick rollers
-
Plough off the printer.
-
Disconnect the ability cord from the back of the printer.
-
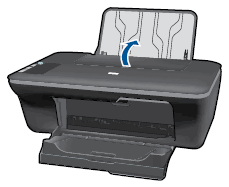
Raise the input tray.
-
Pull the input tray guard back and concord information technology so you can await inside the input tray.
note:
If your printer does non have an input tray baby-sit, skip to the next pace.

-
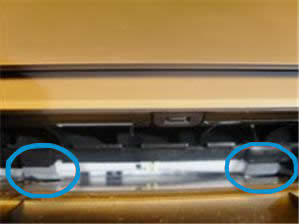
Look down through the open input tray and find the gray paper pick rollers. You might need a flashlight to illuminate the area.
-
Dampen a long cotton wool swab with bottled or distilled water, and so squeeze whatsoever excess h2o from the swab.
-
Press the swab against the rollers and rotate them upwardly with your fingers. Apply a moderate corporeality of pressure to remove dust or dirt buildup.
-
Let the rollers to dry for x or 15 minutes.
-
Reconnect the ability cord to the back of the printer.
-
Plough on the printer.
Footstep ii: Print a self-test written report
Print a self-test report. Come across the section on how to use these solutions at the beginning of this document.
-
If the cocky-test written report prints, try printing the original document again. If the effect is resolved, there is no need to continue troubleshooting.
-
If the cocky-test report prints, but the original certificate does not, continue to the next solution in this certificate.
-
If the self-test written report does non print, try printing the report again. Listen for the rubber paper-pick rollers; y'all should be able to hear them rotating. So, effort slowly pushing the paper farther in until the roller engages to selection up the paper. Be conscientious non to push button the paper in as well far, which can cause paper jams.
-
If the cocky-examination report does not print when slowly pushing the paper farther in, repeat the previous steps to make clean the rollers over again. If the upshot continues after repeated cleaning, skip the next solution in this document, and then service the product.
-
If the cocky-test report prints when slowly pushing the paper further in, endeavour printing the original document again. The paper might not accept been loaded far enough into the product. If the issue is resolved, there is no need to continue troubleshooting.
-
If the paper only feeds through the product when yous slowly push button it farther in, repeat the previous steps to clean the rollers over again. If the issue continues after repeated cleaning, skip the next solution in this document, and then service the product.
-
Solution 4: Make clean the rollers from the printer control panel
Before you can start the make clean ink smear process, you need to make clean the rollers from the printer command panel.
Footstep 1: Clean the rollers from the printer command console
Follow these steps to clean the rollers from the printer control panel.
-
Press the Power button to turn on the printer.
-
Remove the paper from the input tray.
-
Press and hold the Ability button, press the Abolish button three times, press the Start Color Copy button seven times, and then release the Power push button.
-
The printer volition brand some noise for around one minute. Look until the printer stops making noises.
Footstep 2: Start the clean ink smear procedure from the printer control panel
Follow these steps to clean the ink smears.
-
Press the Power button to turn on the printer.
-
Load paper into the input tray.
-
Press and concord the Power button, press the Abolish button three times, press the Start Copy Colour push button eight times, release the power push button.
-
The printer will feed 1 page slowly. The printer will make some noise for approximately i minute. Wait until the page is out of the printer.
Stride 3: Print a self-test study
Print a cocky-examination study. See the department on how to use these solutions at the beginning of this document.
-
If the self-test report prints, effort press the original document again. If the consequence is resolved, there is no need to keep troubleshooting.
-
If the self-test report prints, but the original document does not, continue to the next solution in this certificate.
-
If the self-exam report does not print, endeavour press the study once again. Mind for the rubber paper-pick rollers; you should be able to hear them rotating. Then, try slowly pushing the newspaper farther in until the roller engages to choice up the newspaper. Exist conscientious not to push button the paper in too far, which can cause paper jams.
-
If the self-test report does not print when slowly pushing the paper farther in, repeat the previous steps to clean the rollers again. If the effect continues later on repeated cleaning, skip the side by side solution in this document, and so service the product.
-
If the self-test written report prints when slowly pushing the paper further in, try printing the original certificate again. The newspaper might not have been loaded far enough into the product. If the consequence is resolved, in that location is no demand to continue troubleshooting.
-
If the paper just feeds through the product when you slowly button it farther in, repeat the previous steps to clean the rollers once more. If the issue continues after repeated cleaning, skip the next solution in this document, and then service the product.
-
Solution five: Adjust the paper settings in the impress driver
The product might not pick up paper if the newspaper size and type in the newspaper tray practise not match the size and type settings in the print driver. This feature of the product helps to avoid wasting ink and paper if the paper is not what yous expected.
-
Render to the document you were trying to print when the outcome occurred.
-
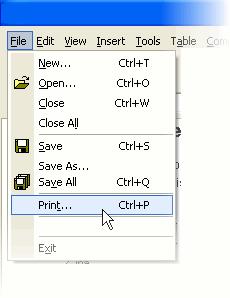
Click File, and and so click Print. The Print dialog box opens.
Figure : Click File, then click Print
-
Select your product, and then click Backdrop. The printer Properties dialog box opens.
-
Click the Paper/Quality tab.
-
From the Media drop-downwards, select the paper type that matches the newspaper you lot take loaded in the production.
-
Click the Advanced tab. The Advanced Options dialog box opens.
-
From the Newspaper/Output drop-down, make sure that the selected option matches your newspaper size. For example, if yous have legal paper loaded in your production, select Legal 8.5x14in.
-
Click OK, then click OK over again to apply the settings.
-
Click OK from the Print dialog box to start the print job.
-
If the document prints, the issue is resolved, and in that location is no need to go on troubleshooting.
-
If the document prints on plain white paper, but not a special paper blazon, in that location is no need to continue troubleshooting. The trouble is probably related to the paper that you were trying to print on, or possibly a connectivity problem. Review the Crusade and Prevention sections at the stop of this document to bank check other possibilities.
-
If the document does not impress, continue with the side by side solution.
Solution six: Service the All-in-One
If the product printed a self-exam report with plain white paper, the printer is functional and does not need to be replaced. Other bug, such as connectivity, print driver settings, special paper, photo paper facing shiny side up, or slick or damaged newspaper might cause the trouble. Review the post-obit sections to learn almost the common causes and how to forestall the issue.
Service or supplant your HP production if the issue persists after completing all the preceding steps.
Go to Contact HP Client Support to schedule a product repair or replacement. If you lot are in Asia Pacific, you will be directed to a local service centre in your area.
To confirm your warranty status, go to HP Product Warranty Check. Repair fees might apply for out-of-warranty products.
 IMPORTANT: But service the product if y'all have already tried all of the previous solutions and the product will not impress a cocky-examination page on plainly white paper.
Forbid newspaper feed issues
Follow these guidelines to help prevent paper feed issues:
-
Load at least 10 sheets of paper into the tray, but practice not overload the tray.
-
Load newspaper correctly, then push the newspaper all the way into the tray.
-
Employ only one type of paper at a fourth dimension in the tray.
-
Store paper in a absurd, dry out place.
-
Use only clean unused paper in the tray.
-
Reload paper that has been in the photo tray for a time. Avoid press on paper that is dusty.
-
Wait for the product to complete a job or to display an 'Out of paper' message before reloading paper.
Cause
Any of the following issues can cause this outcome:
-
The paper trays are empty or overloaded.
-
The paper is curled.
-
The print side, or shiny side, of the paper is not loaded in the tray face downward. For photo newspaper, always load the rougher side of the paper facing up.
-
The paper is too slick for the product.
-
The paper might not be engaged with the feed rollers.
-
The paper-width guide is pressed against the newspaper stack too tightly.
-
The paper tray is not completely inserted into the production.
-
The paper settings in the print driver do non match the paper loaded in the paper tray.
-
The prophylactic paper-feed rollers are dusty.
Source: https://support.hp.com/ph-en/document/c02062993
0 Response to "The Paper in the Printer Almost Comes Out Than Goes in Again"
Postar um comentário